Monday, November 28, 2011

Turkey up in your turkey

Yo Dawg, I heard you like turkey...
and stuffing...
and cranberry sauce...


So we put some turkey, 
and stuffing, 
and cranberry sauce,
all up in your turkey, 
stuffing, and 
cranberry sauce.


Totally Festive Stuffed Turkey Breast!


Cooking turkey is fun. Most folks only do it once or twice a year. I do it a lot more than that because, I sell turkey, but also, I like turkey. It's the least foul of all the fowls and because turkeys have great big breasticies, there are many things you can do with them. Like, for example, play LA plastic surgeon and stuff 'em up!

1. Gather around some company. Turkeys get lonely, you should always plan a feast when cooking up turkey meat. You'll need some starches, some sweets, some green stuff. Get it all together.

2. Tenderly lay out your breast and prepare it for the sacrifice.

3. Splay out the breast. Lay you knife flat, leaving about 5mm on the bottom, and cut it open into one big sheet.

4. Now prepare the sweet, sweet edible silicon replacement that we will use to pump this breast up. In a blender, throw in some of our stuffing mix, some olive oil, and about a half can of cranberry sauce

5. You may need to force it all down into the blender to get it all chopped up, but it should then look like this...not tasty looking at this point.

6. Now, lovingly spread it all over that breast. As always, whenever touching meat, this is a good time to whistle. It calms the meat and makes for less awkwardness should someone walk in on you.

7. Roll it all back up, not too tight, you don't want your stuffing to be forced out. Then gently slide some kebab skewers through the roll to hold it all together. Finally, rub a bit more olive oil and spice (Almighty Spice) on the top.

8. At this point, the breast is ready for some hot, hot lovin'! It needs heat, about 180ÂșC worth, for an hour or two. After the first few months at least, man cannot live by breast alone. Thus pick out a few side dishes and make them all supplicate themselves to the heat source of your choice. In this case, a Roaster Oven.

9. There are many ways to tell if your feast is ready. But pop-up timers are an easy one, and it just so happens that we offer them for sale.

The timer will look like this:

10. Next, let the breast rest. It's worked hard and needs some time to recover. no less than 10 minutes, 20 - 30 is better. This will allow the juices to re-align themselves, much like impotent dictatorships following the Cold War. However in you kitchen, you'll be able to reign in the blood-loss and the waiting makes for a more succulent breast.

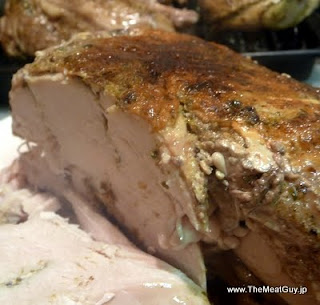
11. Carve it on up! If you've done well, or even if you've only done it half-ass, you will be rewarded with a spirally, meaty, masterpiece.

12. This really was not that much work, it didn't cost much either, so to overcome your guilt, you should serve this on some sort of big wooden plank raised up off the floor. There should be fire, captured on a stick, plates and utensils that peasants can wash later, and plenty of God's inebrious nectar straight from the bottle.

Of course, if you've done everything to perfection, dirty little street urchins will invade you house and try and steal your turkey. Really bad "Yo Mama" jokes will usually drive them away...

Happy Turkey Hunting!

The next time I make this I might do a couple things differently:
  • Rub a bit of salt on the breast once it is all spayed out. This will extract some protein and make it all stick together a bit better. A bit of pounding with a meat mallet would do the same thing.
  • It would probably be better to turn the bread portion of the stuffing into crumbs and then mix in the liquid. This would make it a little dryer so it sucks up more of the turkey juices.
  • I'd drink more wine. I've never seen a recipe that couldn't be improved by the cook drinking more wine.

www.TheMeatGuy.jp 


Tuesday, November 22, 2011

Turkey Confit in a Rice Cooker


This is an oldy but a goody.
I’m always looking for new ways to cook stuff, partly from curiosity, partly because my oven sucks. I was speaking with the chef at one of our restaurant accounts and got interested in confit. Confit, which is French so the “t” is silent for some reason (to get the pronunciation just right you should slur like you’ve just polished off a sixer of chu-hi), is an old-fashioned way to cook and preserve meat.Traditionally you salt the meat and then cook it in it’s own rendered fat, duck leg confit is a staple on the menu at most French restaurants.
Even though confit is cooking in oil, it’s different than frying, it is slow cooking at low temperatures for several hours. I’m not really good at doing anything that takes several hours, both my attention span and memory are so short that the last time I tried to make regular coffee as opposed to instant, the pot sat for two day before I remembered to turn it on. However, I am really good at chucking meat at a heat source and turning up later to see if it’s ready. It turns out that I have an appliance in my kitchen that is perfect for this sort of thing—the rice cooker!
The way a rice cooker works is that it does three basic things. First it brings the pot to a boil under pressure to capture the steam, next it holds that temperature for about 15 minutes to allow the rice to absorb the moisture, then it goes into a “warm” phase to keep it hot. So it quickly heats to 100°C, then drops down to around 50 or 60°C, hot enough to cook and kill any bacteria, but too cool to fry, perfect for confit.

I started with a nice little 7 pound turkey that I had laying around and a pulled out the timer and the plastic thing that holds the legs together, you don't want to cook these in oil.
My rice cooker is not so big so I cut it up into pieces, if you have a large enough cooker, you could do this with the whole bird, that would require a lot of oil. I broke the bird into the leg and thigh portions, wings, back, and breast. There is not much meat on the back so I threw that part into the soup pot along with one wing that wouldn’t fit.
Next I scored it so that the spice rub would penetrate into the meat, then I rubbed it all over with some of our Almighty Spice (oh so very mighty!). This bird was pre-brined so I didn't really need to do much more. If you are working with a bird that has not been brined, then you should generously rub some salt on it as well and let it sit for 10 or 20 minutes.

Pack it into the pot of the rice cooker and fill it full of olive oil. Theoretically you could use a differrent type of oil, but olive oil adds some flavor without greasiness and doesn't produce any bitter aftertastes.


Normally when cooking rice the cooker needs about 10 or 15 minutes to heat up, then it switches into warmer mode. Because I had the bowl totally filled with turkey and oil it took about an hour for it to heat up. I then got drunk, went to a nudie-bar, got kicked out, passed out on the sidewalk, got a lift home from a scooter-gang, and stumbled in to see that my rice cooker had been warming for 6 hours. You can do whatever you want while it cooks, you don't have to do what I did.


I had the munchies somethin' fierce so I pulled the turkey out of the cooker and let them rest on some racks for about 10 minutes. You need to let it rest because the turkey gets tired after all that cooking, and you should probably give yourself a little break as well. You deserve it!


After a little rest, just start carving. This bird came out perfectly done. The meat could be pulled off the bone but it wasn't flaky. It was not greasy or oily AT ALL! The herbs and spices really penetrated and the only way I could tell that it was cooked in olive oil is that the fruity flavor of the oil was infused throughout the meat. This was, by far, the best tasting turkey I've ever had! I recommend you give it a try.


Edit:  I've been asked if it's possible to reduce the oil consumption and it is! Take the turkey, cut it into small pieces, pack it into ziplock bags filled with olive oil. Squeeze out all the air. Then fill your rice cooker with water rather than oil and you will get the same result. Since oil is lighter than water, your bags will float, so it will work better if you weight them down with a rock or something.


-TMG

Wednesday, November 9, 2011

Krispy Fried Turkey Karage

Frying is not just the domain of chickens and the Scottish anymore. Turkey, unsurprisingly, tastes great fried, either whole, or cut up. Our "Turkey Spare Ribs" (which may or may not contain ribs, but always contain turkey),  are a whole turkey, cut up into finger food-sized pieces. We originally started cutting up turkeys to make them easier to cook on the grill, since then we've used them in stews, tajins, and fried, like chicken only better. These are good enough that you'll be licking your fingers, and possibly the fingers of anyone around you (don't try this at work).

Krispy Fried Turkey Recipe
Watch your fingers!


You will need:
Turkey Spare Ribs.................................................1 pack (1 kg.)
Whole Wheat Flour.................................................1/2 cup
Corn Starch (katakoriko)....................................2 Tbsp.
Almighty Spice Mix..................................................2 Tbsp.
Enough oil for frying, a pan to put that oil in, and a heat source to make that oil hot.

Step 1. Pat the turkey dry with a paper towel, then combine all the ingredients in a large food-safe bag.


Step 2. Shake the bag like it's the neighbor's cat you just caught peeing on your floor. Scream at it a couple times as well. You want to shock the ingredients into sticking onto the turkey. Try not to break the bag, it makes a helluva mess if you break the bag while shaking and screaming at it..


Step 3. In a shallow pan, with just enough oil to nearly cover the turkey pieces, fry, fry away. Your oil should be about 180 degrees C. I've never once checked the temperature of the oil, I figure it's ready if it goes critical when I splash a drop of water in it, too hot if it's smoking. Flip the pieces every few minutes until they turn a nice golden brown.


Step 4. Drain the chicken over some paper towels. Sprinkle on a little salt if you are so inclined.


Step 6. Nom nom nom....

A perfect way to enjoy turkey for the holidays if you don't have an oven.


Pretty, Pretty, Pork Loin

Pork loins are tasty. Pork loins are also lean so you have to be a little careful or they can turn out dry and flavorless. They are also really cheap but with just a bit of fancy knife work and some aggressive rubbing technique, you can make them look ritzy!

Pork Loin Roast Recipe
So good you'll lick your elbows!


You will need:
Pork Loin..................................2 Kg block.
Paprika powder.....................2 Tbsp.
Mustard Seed........................2 Tbsp.
Brown Sugar..........................2 Tbsp.
Sea Salt...................................2 Tbsp.
Black Pepper.........................1 Tbsp.
Taco & Chili Spice..............a pinch or two, maybe more.
Olive Oil....................................1 Tbsp.
A metal box that can produce and trap heat in a temperature controlled environment, or just a normal oven.
A really long tongue if you want to try and lick your elbow.

Step 1. Prepare your pork loin and all your ingredients for the rub.

Step 2. Grind up the mustard seeds (fresh ground taste MUCH better than pre-ground, same with pepper). And mix all the ingredients together with just enough olive oil to make it "pasty". Our Taco & Chili spice is very spicy so if you don't like spicy, don't add too much. Paprika, even though it looks spicy, isn't. It is mostly just a pretty red color.


Step 3. Carve a "checkerboard" pattern into the fat cap. Be sure to cut all the way into the meat a couple of milimeters. This will get the flavor of the rub deep into the meat, and it will make for a pretty, pretty, piece of pork.

Step 4. Now it's time to aggressively lay your hands on the meat. Take the rub and massage it into the meat, make sure you get it down into the cuts that you've scored. It's good to whistle while you do this, it keeps the pork distracted so that it doesn't clench-up when you rub it in tender places.


Step 5. Wrap and wait. You can skip this step but if you wrap the pork tightly in saran wrap, then let it sit for at least 30 minutes (overnight would even be OK), the meat will draw the flavors inside and come out better.


Step 6. Roast away! Place your pork on a roasting rack (this will make sure it cooks evenly) and set your cooking apparatus for approximately 200 degrees C. Cook for about 1 - 1 1/2 hours, there is a huge difference in cooking speeds between ovens, a meat thermometer is the best way to know when your roast is done. Take it out when the internal temperature reaches about 63 degrees C. Then allow it to rest for about 10 minutes.


Step 7. Devour. Now is a good time to dig-in up to your elbows.


This is enough to feed 8 - 10 people, or to provide a real feast for 5 or 6. If this is too big for you you can also use a 1 kg pork loin, if it's too small, go for the whole loin. This rub will work well on pretty much any piece of pork, except for pork purchased in stores other than www.TheMeatGuy.jp.  If you try and use this recipe on other pork, you will catch something nasty.