
Roast chicken rocks, and in Japan, where the Colonel rules come Christmas day, it's important that everyone knows how to pop one in an oven. Here is a recipe for you!

What you will need: (all available in a set coming soon.)
- A chicken of the whole variety, complete with legs, wings, and plump, natural breasts. 1 kg or 1.3 kg sizes are available, the 1.3 is pictured below.
- An oven bag (please don't put this on your head).
- A pop-up timer, the kind that pops up when it reaches a certain temperature (not the other kind, (actually, I don't think there is another kind)).
- Some dressing/stuffing mix, in this case it will be called dressing since it will go below the chicken rather than in the chicken, which is the principle difference between the two, I believe.
- A shallow roasting pan. The one pictured came from the 100 yen store, you can also get them at most any home center in the camping section (yes, that is strange that a roasting pan would be in the camping section, but in Japan people use them for yaki-soba and yes, it is strange that yaki-soba is the ultimate camping food, I'm now stuck in a double paranthesied spiral of strangeness)).
- A little bit of olive oil.
- An oven, if it's a microwave/oven combo, then make sure it's set for "oven" or is this won't work very well, although the roasting pan should give off some pretty cool sparks.

---If your oven takes a long time to warm-up,
now would be a good time to pre-heat it to 220ºC--
Step 1: Make sure your chicken is completely thawed out, rinse it off in the sink, especially the cavity. If the chicken is not completely thawed, then let it sit in a bowl under the faucet with cold water running over it for a few minutes. If you try and cook the chicken when it's still a little frozen, things are not going to go so well for you. (However, it is possible to cook it from completely frozen, it just takes a lot longer and that's a post for a different day.) Pat it dry with some paper towels. I'm not sure that this is necessary, but all recipes call for patting down your bird. Live out your TSA fantasies at this time.
Step 2: Trim away the excess skin and fat from around the neck. You can save this skin and deep-fry it for a very tasty, artery-clogging snack!

Step 3: Add about 2 tablespoons (those are the large ones) of olive oil, or butter, or some other kind of oil if you don't have olive oil or butter (but seriously, if you don't have olive oil or butter in your kitchen, you're doing it wrong). And the contents of the special roast chicken spice packet. If you don't have the roast chicken spice pack, then just use some salt, pepper, garlic, rosemary, and any other spices that you think might taste good on chicken.

Step 4: Rub that spice and oil all over your chicken. It's a good idea to light some candles and play some Barry White while you do this, this will help the chicken relax and make it more tender. The spices don't really penetrate the skin, so if you want the meat of the chicken to be spiced as well, then also rub some spices between the skin and the meat. That's too much trouble for me though, I just rub it on the outside, but you can do what you want.


Step 7: To keep your chicken from going all splay-legged and looking like a drunken sorority girl, it's a good idea to tie the legs together with a bit of string (use cotton string).

Step 8: Pull out your roasting pan, open up the oven bag, and place it in the pan.

Step 9: Add the entire contents of the stuffing mix into the bag.

Step 10: Add about 1/3 to 1/2 cup of moisture to the bag. Beer works great, so does wine, even whiskey. Keep in mind that it's the moisture that is important, not so much the intoxicating qualities of this ingredient, so intoxicating ingredients that are not liquid will not work very well.

Step 11: Close the bag and shake the hell out of it. Bounce on one foot while you do this, this will ensure that everything mixes properly. If you are confined to a wheelchair, or otherwise immobilized and are unable to bounce on one foot, then add in some hootin' & hollerin' so that you are able to approximate the appropriate amount of craziness. When finished, the stuffing should be well mixed, but it will look a little dry. That's OK, since we are cooking the chicken on top of the dressing, it will catch all the glorious chicken juices and be just the proper amount of moistness.

Step 12: Spread the bag out nicely in the pan, then place the chicken on top of the stuffing. 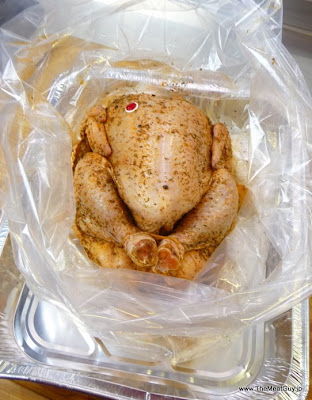

Step 13: Close up the bag using the handy little tie-thingy that is included. If you've lost your tie-thingy, just use a bit of string, or a twisty, or something else.

Step 14: Cut off the excess plastic remaining after you've closed the bag. You can say a little prayer here if you'd like during this sacred oven-bag bris.

Step 15: Cut some holes in the top of the bag, 4 - 6 holes should do it. This is to let some of the steam out while it is cooking so that the bag doesn't blow up like a balloon.

Step 16: It's Oven Time! Put the bird in the oven, close the door, roast it at about 220ºC for about 1 hour. Start checking it after 30 minutes or so. Ovens in Japan have a very wide range of cooking times. It depends on if it's gas or electric, large or small, how often you open it, if it's a convection oven or not, etc., etc.

After 45 minutes or so, your chicken should look like this:


Step 18: Resting. Let the poor bird rest a few minutes, at least 10, 15 is perfect. Tent some foil with the shiny side inwards over the chicken and just let it chill out. This allows the juices to be re-absorbed into the meat and will result in a more moist chicken. Also, if you like your stuffing to have a nice crispy crust, you can chuck it back into the oven for a little bit longer.

Step 19: The enjoying! There you go, a perfect roast chicken! You can now nicely carve it up, or just rip into with your bare hands. We recommend the bare hands, bare chested method of chicken consumption at all times (although it will sometimes get you kicked out of certain restaurants).

This recipe works on other meats than just chicken! You can roast turkeys, ducks, rabbits, or pigs the same way. Just vary the cooking time.
Hooray!


