Wednesday, November 9, 2011

Krispy Fried Turkey Karage

Frying is not just the domain of chickens and the Scottish anymore. Turkey, unsurprisingly, tastes great fried, either whole, or cut up. Our "Turkey Spare Ribs" (which may or may not contain ribs, but always contain turkey),  are a whole turkey, cut up into finger food-sized pieces. We originally started cutting up turkeys to make them easier to cook on the grill, since then we've used them in stews, tajins, and fried, like chicken only better. These are good enough that you'll be licking your fingers, and possibly the fingers of anyone around you (don't try this at work).

Krispy Fried Turkey Recipe
Watch your fingers!


You will need:
Turkey Spare Ribs.................................................1 pack (1 kg.)
Whole Wheat Flour.................................................1/2 cup
Corn Starch (katakoriko)....................................2 Tbsp.
Almighty Spice Mix..................................................2 Tbsp.
Enough oil for frying, a pan to put that oil in, and a heat source to make that oil hot.

Step 1. Pat the turkey dry with a paper towel, then combine all the ingredients in a large food-safe bag.


Step 2. Shake the bag like it's the neighbor's cat you just caught peeing on your floor. Scream at it a couple times as well. You want to shock the ingredients into sticking onto the turkey. Try not to break the bag, it makes a helluva mess if you break the bag while shaking and screaming at it..


Step 3. In a shallow pan, with just enough oil to nearly cover the turkey pieces, fry, fry away. Your oil should be about 180 degrees C. I've never once checked the temperature of the oil, I figure it's ready if it goes critical when I splash a drop of water in it, too hot if it's smoking. Flip the pieces every few minutes until they turn a nice golden brown.


Step 4. Drain the chicken over some paper towels. Sprinkle on a little salt if you are so inclined.


Step 6. Nom nom nom....

A perfect way to enjoy turkey for the holidays if you don't have an oven.


Pretty, Pretty, Pork Loin

Pork loins are tasty. Pork loins are also lean so you have to be a little careful or they can turn out dry and flavorless. They are also really cheap but with just a bit of fancy knife work and some aggressive rubbing technique, you can make them look ritzy!

Pork Loin Roast Recipe
So good you'll lick your elbows!


You will need:
Pork Loin..................................2 Kg block.
Paprika powder.....................2 Tbsp.
Mustard Seed........................2 Tbsp.
Brown Sugar..........................2 Tbsp.
Sea Salt...................................2 Tbsp.
Black Pepper.........................1 Tbsp.
Taco & Chili Spice..............a pinch or two, maybe more.
Olive Oil....................................1 Tbsp.
A metal box that can produce and trap heat in a temperature controlled environment, or just a normal oven.
A really long tongue if you want to try and lick your elbow.

Step 1. Prepare your pork loin and all your ingredients for the rub.

Step 2. Grind up the mustard seeds (fresh ground taste MUCH better than pre-ground, same with pepper). And mix all the ingredients together with just enough olive oil to make it "pasty". Our Taco & Chili spice is very spicy so if you don't like spicy, don't add too much. Paprika, even though it looks spicy, isn't. It is mostly just a pretty red color.


Step 3. Carve a "checkerboard" pattern into the fat cap. Be sure to cut all the way into the meat a couple of milimeters. This will get the flavor of the rub deep into the meat, and it will make for a pretty, pretty, piece of pork.

Step 4. Now it's time to aggressively lay your hands on the meat. Take the rub and massage it into the meat, make sure you get it down into the cuts that you've scored. It's good to whistle while you do this, it keeps the pork distracted so that it doesn't clench-up when you rub it in tender places.


Step 5. Wrap and wait. You can skip this step but if you wrap the pork tightly in saran wrap, then let it sit for at least 30 minutes (overnight would even be OK), the meat will draw the flavors inside and come out better.


Step 6. Roast away! Place your pork on a roasting rack (this will make sure it cooks evenly) and set your cooking apparatus for approximately 200 degrees C. Cook for about 1 - 1 1/2 hours, there is a huge difference in cooking speeds between ovens, a meat thermometer is the best way to know when your roast is done. Take it out when the internal temperature reaches about 63 degrees C. Then allow it to rest for about 10 minutes.


Step 7. Devour. Now is a good time to dig-in up to your elbows.


This is enough to feed 8 - 10 people, or to provide a real feast for 5 or 6. If this is too big for you you can also use a 1 kg pork loin, if it's too small, go for the whole loin. This rub will work well on pretty much any piece of pork, except for pork purchased in stores other than www.TheMeatGuy.jp.  If you try and use this recipe on other pork, you will catch something nasty.  

Tuesday, November 8, 2011

Stuffed Lamb Leg - Even Easier than your Mom!

Boneless lamb legs are ideal for stuffing and rolling and there are very few flavors that don't go well with lamb. This recipe is so simple, even the dumbest person you can think of can probably pull it off. If that person is you, then prepare to be not too terribly challenged!

Stuffed Lamb Leg Recipe


What you will need:
Boneless lamb leg.................................................1 pc. (2 - 3Kg)
Green Olives............................................................about 1/2 can (75gm)
Feta Cheese............................................................about 1/2 tub (250gm)
Almighty Spice Mix..............................................2 Tbsp
Olive Oil......................................................................1 Tbsp.
Some cotton string to tie it up.
An oven or a grill or a smoker or something to cook it in.
A hunger equivalent to 7 burly grown men.

Step 1. Assemble your ingredients and double check to make sure you have everything.


Step 2. Chop up the olives into little pieces.


Step 3. Cut up the Feta cheese into little pieces, these pieces don't have to be that little because the cheese will get broken up later.


Step 4. Add the Almighty Spice and the Olive Oil to the cheese and olives and mix it up good. Then mix it up some more.


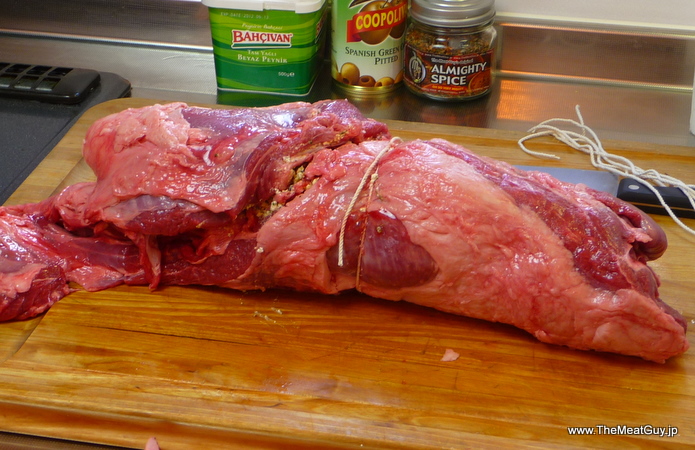
Step 6. Start hacking up the lamb leg. The goal is to spread it out fairly flat and into a shape resembling a rectangle. The thicker part of the leg will have a hole in the middle (this is where the bone used to be). Open that part up by cutting through the side opposite to the fat side. The cut most of the way through the thinner part to flatten it out. At this point, if you really feel like working out some aggression, you can even pound it a few times with a meat mallet.


Step 7. Spread the cheese and olive mixture over the meat. Don't worry about getting it right up to the edge, when you roll the leg later it will get squished around plenty.


Step 8. Roll the leg back up and start tying it off. Any type of cotton string will do, butcher's twine is the best. To make a butchers knot, wrap one string around the other just like the first step of tying your shoe (should you be unfortunate enough to not have velcro on your shoes) but then wrap it two more times and pull it tight. Finally, tie another "granny knot" on top and you've done it.


Step 9. Tie up the rest of the leg in even intervals, then tie a couple more lengthwise to hold it all together. If you are really not so good with knots, or are linonophobic you can cheat by skewering the meat in several places with kebab skewers. A little OCD is sometimes a good thing, so snipping the loose ends of the string will make things look more professional.

Step 10. Coat the outside of the roast with a bit more Olive Oil and Almighty Spice.

Step 11. Ready for the oven! A pre-heated oven is faster, but starting with a cold oven will cook it all more evenly. Set the temperature for about 210 degrees C. Ovens have a huge variation in cooking times, gas convection ovens are the fastest, electric ovens are the slowest. It will take anywhere from 1 hour and 15 minutes to over 2 hours. Using a good meat thermometer, you should cook until the internal temperature is about 55 degrees C. Then remove from the oven, tent with foil, and allow it to rest for at least 10 minutes.


Cut off the string and carve crosswise. Serve with some side dishes, maybe a sauce, red wine would be good too.

Step 12. Take pictures of your masterful creation, post them online, send them to us, tell everyone you know how great the lamb leg was. As with many of our other recipes, in theory this may work with meat from other purveyors, however we are required by law to warn you that attempting to make this recipe with ingredients sourced from anywhere other than The Meat Guy may result in your weenie falling off.


Brining - It's all about salt and water!

This time of year I get a lot of questions about brining, especially as it relates to turkeys. Whole turkeys, because they are large and require a long cook time, and because they are pretty low in fat, can easily turn dry if you overcook them. The turkey industry is aware of this and to try and make it easier for the home chef to turn out a moist turkey every time, they often pre-brine their turkeys. Traditionally this would be done by submerging the turkey in salt water, but on a large scale it is more likely done by injecting salt water directly into the meat. Turkeys that have been treated this way tend to be sold as "enhanced", "pre-brined", "basted", or some other wording that is not "natural" or "no added ingredients". While pre-brined turkeys are easier, they may not be a better deal, that salt water might add an extra 12 - 14% in weight which you pay turkey prices for*. We handle both kinds of turkeys and try and let our customers know what they are getting in advance, but sometimes we don't know until we open up the cases.

Now let's say you've gotten your hands on a bird that has not been pre-brined. You don't have to brine it, brining just makes it a little more juicy and also gives you a bit more wiggle room if you overcook the turkey. Most of our smaller sized birds are not pre-brined, but the smaller birds don't dry out as much anyway so it's not such a bid deal. However, if you brine it, then when people compliment you on how great the turkey tastes, you can say something like, "Well, that's because of my great-great-grandma Bambi's secret brine recipe that I slaved over for the last couple of days." Then people will be amazed that you have a stripper in your lineage, you won't be able to get this amazement without brining your bird.

Meat loves salt, it's the perfect ingredient and the perfect condiment rolled into one. When meat is brined, or even when it dry-rubbed with a salty mix, the brine seeks to form an equilibrium. Since the water inside the cells of the meat has less salt than the brine, the brine water is absorbed (osmosis anyone?). Many meat proteins are soluble in salt, so the brine relaxes these proteins allowing space for even more water to be absorbed. The net effect is an uptake in water, salt, and any other flavors that you add to your brine. Note, this only works for water soluble flavors, so sugar works great but many spices are not water soluble. However, by briefly warming crushed spices in oil, which they are soluble in, and then mixing them into your brine, you can increase your chances that they will be drawn into the meat.

The difference between brining and salt curing are a little hazy. In both instances salt is used to help the meat pick up flavor, but in curing salt's antibacterial properties are at the forefront, whereas in brining it's more about the water. However, at higher concentrations brining is an excellent way to cure all kinds of things. Bacon is brined pork belly, Corned Beef is brined beef brisket, Ham is brined pork leg meat, and Pickles are the brined penises of the common garden gnome.


How to Brine a Turkey
The Meat Guy Method

1. Get yourself a food-safe container big enough for the bird, plastic is best, stay away from anything metal because it will react and make things taste metaly. I wouldn't recommend wood either, oven bags work great and you can then re-use it to cook your turkey in.

2. Weigh the empty container and write down the weight, approximate is fine, you can even use a bathroom scale.

3. Put the unwrapped turkey in the container, fill the container with water, then take out the turkey.

4. Weight the container which is now partially full of water. Subtract the weight of the container that you had written down. Now you've got the weight of the water, which, becauase of the joys of the metric system, is also the volume! (1 kg = 1 Lt.) If you are working with pounds you should basically give up at this point because you can't convert pounds to gallons, but if you want to try you can use 8 pounds per gallon.

5. Add salt, it's best to use sea salt--we sell two kinds, Fino and Grosso, both work just fine. Don't use iodized salt, it will make it taste iodiney. You want to use 50-60 grams of salt per liter of water and 20 grams of sugar. It's easier to dissolve the salt and sugar if you take a portion of the water, heat it on the stove, and dissolve the salt in the hot water, then return the mixture to the rest of the water in the container. An old wive's tale says that you've got enough salt in your brine if a potato floats, I try not to mess around with old wives.

6. Add other stuff, throw in some garlic, spices, maybe some bourbon (bourbon makes anything better). As the turkey sucks up the brine solution, it will also suck up any other flavors that you want to add. Be creative!

7. Put the turkey in the brine, it will float so you want the container cover to be able to hold it under a little bit, you can also pick up one of those weights that they use to make Japanese pickles, they work really well.

8. Put the whole mixture in the refridgerator. If your fridge is too small, you can put it in a cooler box with ice, add more ice as it melts.

9. Wait, at least 12 hours, 24 is better, 48 is a bit too long.

10. Remove the turkey, rinse it well, cook it! Don't re-use the brine!

Best of luck and Happy Brining!


*This is not exclusively the realm of the turkey industry, many types of meat, especially those that are sold in large discount chains, tend to be "enhanced". We have very few items like this and we always try and let our customers know what they are getting.

Monday, October 31, 2011

A Roast chicken recipe for people who are probably above average intelligence but lack cooking skills.


Roast chicken rocks, and in Japan, where the Colonel rules come Christmas day, it's important that everyone knows how to pop one in an oven. Here is a recipe for you!


What you will need: (all available in a set coming soon.)
  1. chicken of the whole variety, complete with legs, wings, and plump, natural breasts. 1 kg or 1.3 kg sizes are available, the 1.3 is pictured below.
  2. An oven bag (please don't put this on your head).
  3. A pop-up timer, the kind that pops up when it reaches a certain temperature (not the other kind, (actually, I don't think there is another kind)).
  4. Some dressing/stuffing mix, in this case it will be called dressing since it will go below the chicken rather than in the chicken, which is the principle difference between the two, I believe.
  5. A shallow roasting pan. The one pictured came from the 100 yen store, you can also get them at most any home center in the camping section (yes, that is strange that a roasting pan would be in the camping section, but in Japan people use them for yaki-soba and yes, it is strange that yaki-soba is the ultimate camping food, I'm now stuck in a double paranthesied spiral of strangeness)).
  6. A little bit of olive oil.
  7. An oven, if it's a microwave/oven combo, then make sure it's set for "oven" or is this won't work very well, although the roasting pan should give off some pretty cool sparks.


---If your oven takes a long time to warm-up,
now would be a good time to pre-heat it to 220ºC--

Step 1: Make sure your chicken is completely thawed out, rinse it off in the sink, especially the cavity. If the chicken is not completely thawed, then let it sit in a bowl under the faucet with cold water running over it for a few minutes. If you try and cook the chicken when it's still a little frozen, things are not going to go so well for you. (However, it is possible to cook it from completely frozen, it just takes a lot longer and that's a post for a different day.) Pat it dry with some paper towels. I'm not sure that this is necessary, but all recipes call for patting down your bird. Live out your TSA fantasies at this time.

Step 2: Trim away the excess skin and fat from around the neck. You can save this skin and deep-fry it for a very tasty, artery-clogging snack!

Step 3: Add about 2 tablespoons (those are the large ones) of olive oil, or butter, or some other kind of oil if you don't have olive oil or butter (but seriously, if you don't have olive oil or butter in your kitchen, you're doing it wrong). And the contents of the special roast chicken spice packet. If you don't have the roast chicken spice pack, then just use some salt, pepper, garlic, rosemary, and any other spices that you think might taste good on chicken.


Step 4: Rub that spice and oil all over your chicken. It's a good idea to light some candles and play some Barry White while you do this, this will help the chicken relax and make it more tender. The spices don't really penetrate the skin, so if you want the meat of the chicken to be spiced as well, then also rub some spices between the skin and the meat. That's too much trouble for me though, I just rub it on the outside, but you can do what you want. 


Step 6: Insert the pop-up timer in the thickest part of the breast, this is about halfway between where the wing tip folds over and the center of the bird. (Note: the breasts are on the front of the bird.)

Step 7: To keep your chicken from going all splay-legged and looking like a drunken sorority girl, it's a good idea to tie the legs together with a bit of string (use cotton string).


Step 8: Pull out your roasting pan, open up the oven bag, and place it in the pan.

Step 9: Add the entire contents of the stuffing mix into the bag.

Step 10: Add about 1/3 to 1/2 cup of moisture to the bag. Beer works great, so does wine, even whiskey. Keep in mind that it's the moisture that is important, not so much the intoxicating qualities of this ingredient, so intoxicating ingredients that are not liquid will not work very well.

Step 11: Close the bag and shake the hell out of it. Bounce on one foot while you do this, this will ensure that everything mixes properly. If you are confined to a wheelchair, or otherwise immobilized and are unable to bounce on one foot, then add in some hootin' & hollerin' so that you are able to approximate the appropriate amount of craziness. When finished, the stuffing should be well mixed, but it will look  a little dry. That's OK, since we are cooking the chicken on top of the dressing, it will catch all the glorious chicken juices and be just the proper amount of moistness. 

Step 12: Spread the bag out nicely in the pan, then place the chicken on top of the stuffing. 

Step 13: Close up the bag using the handy little tie-thingy that is included. If you've lost your tie-thingy, just use a bit of string, or a twisty, or something else.

Step 14: Cut off the excess plastic remaining after you've closed the bag. You can say a little prayer here if you'd like during this sacred oven-bag bris.

Step 15: Cut some holes in the top of the bag, 4 - 6 holes should do it. This is to let some of the steam out while it is cooking so that the bag doesn't blow up like a balloon.

Step 16: It's Oven Time! Put the bird in the oven, close the door, roast it at about 220ºC for about 1 hour. Start checking it after 30 minutes or so. Ovens in Japan have a very wide range of cooking times. It depends on if it's gas or electric, large or small, how often you open it, if it's a convection oven or not, etc., etc.

After 45 minutes or so, your chicken should look like this:

Step 17: Even with the pop-up timer, it's still a good idea to use a meat thermometer. The pop-up timer that we sell is designed to pop at about 77ºC, once it pops, the breast meat is finished, but if you have poor circulation in your oven, or are cooking too hot and fast, then the thigh meat might need a few extra minutes so it's worthwhile to check with a quick-read thermometer as well. After about 45 minutes, you want to check and see how well your turkey is browning. If you like crispy skin, then you might want to cut the top of the bag open to hasten that along. If the timer has popped, then turn up the temperature and scorch the outside for 5 or 10 minutes, it the timer hasn't popped then just proceed as normal until it pops.


Step 18: Resting. Let the poor bird rest a few minutes, at least 10, 15 is perfect. Tent some foil with the shiny side inwards over the chicken and just let it chill out. This allows the juices to be re-absorbed into the meat and will result in a more moist chicken. Also, if you like your stuffing to have a nice crispy crust, you can chuck it back into the oven for a little bit longer.


Step 19: The enjoying! There you go, a perfect roast chicken! You can now nicely carve it up, or just rip into with your bare hands. We recommend the bare hands, bare chested method of chicken consumption at all times (although it will sometimes get you kicked out of certain restaurants).


This recipe works on other meats than just chicken! You can roast turkeys, ducks, rabbits, or pigs the same way. Just vary the cooking time.

Hooray!